January 30, 2009

Good Old Fred

I plan on adding a new item to my collection of Haunted Mansion tombstone paper models.
"Good Old Fred" has one of my favorite epitaphs!

January 28, 2009

Coming Soon!

I am finished creating the Bates House pieces and I am in the process of adding
the scoring lines in Illustrator. Then I will build the prototype and record the process
for the construction directions.

January 27, 2009

Psycho Music

I purchased some mood music to listen to while I continue to design my Bates House.
The Royal Scottish National Orchestra plays the full musical score of "Psycho"!
I bought it from iTunes, and look at the great album art.
I completed the textures and art for the model and have begun adding the tabs, slots and score lines.
I might have a prototype constructed before the end of the week!

January 24, 2009

Archiving News & Notes to blogger.com!

I just completed the process of transferring this "blog" (News & Notes) from Haunted Dimensions. 
It became tedious to manage this page in Dreamweaver since I had no automatic archiving capability, and it would require that I build a new web page every time I needed more space. In order to postpone creating new web pages for archives (due to my own laziness), I would simply delete most of my posts after a month or two. Of course, that is the opposite of archiving!

I will continue to post all new posts on the Haunted Dimensions News & Notes page as usual,
but instead of deleting old posts, I will transfer them here.
Haunteddimensions.blogspot.com will be used as the new archive .

I'm still in the process of learning how it all works, and I'm sure I'll be hacking it as soon as know how. Meanwhile, stay tuned.

January 23, 2009

The Disney Special That Started It All For Me

The year, 1970.
The show, Disneyland Showtime.
Little Donny Osmond and little Kurt Russell, along with the rest of the Osmond brother, and actress/singer E.J. Peaker, took me on a jaw-dropping tour of the brand new Haunted Mansion attraction at Disneyland.  It became my obsession!  It took me 23 years to finally get there for the first time!  As I watch this again, I still get the same thrill and sense of awe I felt when I first saw it (when I was 7)!

January 22, 2009

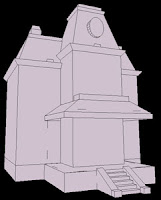
Bates House Model Update


Alfred Hitchcock and the Bates House 1960

I am nearly finished creating the art and textures for the Bates house model.

As you probably know, the "original" Bates House set is located at Universal Studios, Hollywood, and is one of the highlights of the backstage tram tour. Despite being an icon of movie history, the Bates House facade is still just a movie prop, and as such it has been altered, repainted, and reconfigured over the years for the many movies and TV shows in which it has appeared since "Psycho". In fact, the entire structure has even been moved to different areas of the backlot over the years!
Universal Studios, Orlando, constructed a Bates House for their tour but sadly it was later
torn down to make room for the "Kid Zone".

So one of my challenges was to decides what version of the Bates House to design.

Of course, my preference was to stay true to the house as it appears in "Psycho", but as is so often the case, Hitchcock's Bates House was not constructed as a fully completed house. It was just a facade consisting of the front and left faces of the house. There was no right side, rear, or even a roof! Since then, Universal has completed the structure, so I'm basing those unseen sides on what is there now.
I also chose to make the house appear aged and run down since many of you will probably use your models as Halloween decorations. It will be a relatively accurate model of the movie facade, but it will also serve your generic haunted house needs.

Another small obstacle I encountered was in not knowing the dimensions of the facade.
This information would be important in determining the scale of the model.
I could find no information on the height of the house, but a friend of mine who works
with Polar Lights, told me the dimensions of the Polar Lights plastic model kit, and I used those numbers to determine a height of approximately 31 feet from foundation to tower top.

Below is a rough comparison of the size differences between Liberty Square and the Bates facade.

I would like my Bates House to be the same scale as my other Disney haunted mansion models, but the Disney facades are much larger than the Bates House. To design the house at the same scale as the mansions would mean it would only be 6 inches tall. Personally, I want my Bates House to be larger, so I decided that I will design the house to be 8 or 9 inches tall, but I would figure out the percentage of reduction needed for those who want to print their Bates House to be the same scale as the others.

January 15, 2009

Bates House Model 3D

My usual process for designing my paper models is to create the object in a 3D applications (Lightwave), disassemble it and bring it into a graphics program to apply textures (Photoshop and Illustrator). At this point I would also figure out the placement of the tabs and slots.
This time I decided to add the tabs and slots while I am still in the 3D application. This allows me to have an accurate placement of tabs and slots before I bring it into Photoshop, and determine if there are any conflicts with other parts.  I believe this will make the construction design much easier and faster since there will be much less trial and error in the process .

January 13, 2009

Putka Pod Possibilities!

The smallest pumpkins I ever carved!
After a little bit of experimentation and a lot of patience, I figured out how to carve my Putka Pods into extremely tiny jack-o-lanterns!
(See January 11th post, below, for an explanation of Putka Pods)

Using an X-acto blade, I first "drilled" small holes by carefully twirling the tip of the blade where I wanted my eyes to be. Then I carefully shaved around the holes to make them more irregular and less round.
I did the same process for the mouth, making a series of unconnected holes, in the general shape of a mouth. Then I "broke" between the holes until the mouth was complete. I drilled the nose hole last since, by this point the face is much more fragile, and I could stop drilling before the  face cracked or split.
Click image to enlarge
They are relatively hollow inside, other than a few seeds and segment walls, so they even look like carved pumpkins inside! Of course, not every attempt was successful. For every two successes, there was at least one failure caused by weak segments, cracks or carelessness. Luckily, my quarter lb. bag has a couple hundred pods, so I had plenty to spare.
I even experimented with soaking a few (and even boiling a few) to see if softening them made them more resilient. All it did was to make them rubbery and even more difficult to carve.

They are gnarly and unique!
Click image to enlarge
I feel a need to show you how small these guys really are!
So here is the batch I made this afternoon, compared to a U.S. quarter and a push pin.
Click image to enlarge
Here are some close shots of my "Putka Pumpkins" as they look on my Skoolhouse model.
The link to the free "The Skoolhouse" model I designed for Universal Studio can still be found on the Halloween Horror Nights website.
The link can be found in the November 20th post at the bottom of this page.
All of my other paper models found here, at Paper Model Purgatory.

Here is a shot of my Skoolhouse model. I used twings from the yard as trees and craft moss.This model is about 6.5 inches long.


And here are a few on the steps of my Phantom Manor model.
Find some Putka Pods and take a stab at it (without stabbing your fingers)!
Even if you do not carve them, they make sickeningly cute additions to your models, mantels, wreaths, and displays during the Halloween season!

January 11, 2009

Putka Pods!


Aren't they cute?!

Imagine this. Very tiny, organic, dried "pods" that look exactly like full sized pumpkins and are the perfect scale to use with my paper models!
I first discovered Putka Pods in a local farmer's market last year but for some reason I didn't purchase them. It wasn't until I was building my " Skoolhouse" model when I realized that these pods would look awesome on the model. Of course, then I couldn't find them again, and even the owner of the farmer's market stand where I first saw them, had no idea what I was talking about when I described them.
After a quick search online, using "pumpkin pods" as the subject, I learned they were called "Putka Pods".
They are grown in India and are dried. They range in size from less than 1/2 inch to 1 inch, and like real pumpkins, each pod has a unique personality. The natural dried color is a burnt orange, but they are available in a range of dyed colors and are sometimes infused with potpourri scents. They are very hard and seem durable, almost like a nut. Many even have little stems!
They are easy to find online and I bought a quater pound of them on Ebay for less than $5!

Even if you don't have any of my models, these pods have tremendous potential in the hands of creative folks (like you) here in the Haunted Dimensions!
I'll show you what I do with them in the coming weeks.
Click image to enlarge

January 4, 2009

New Year, New Model

I have begun work on a new paper model.
The Psycho House!
The basic 3D model is completed and my next step is to unfold it, then add textures.
I have no schedule for completion, so stay tuned.
(The photo above is of the actual building facade at Universal Studios, Hollywood.)